Downloading, Installing, and Configuring Foundry VTT
Foundry Basics
Hello everybody! This series will walk you through how to use Foundry as a GM. If you’re a player, I’ve got a player’s guide just for you over on YouTube. If there’s a big update to any of the topics in this series I’ll make an update and record new video as needed. So if you’re reading this series you can rest assured that pretty much everything you’ll see should still apply to the current version of Foundry even if it’s a bit old. But let’s get started. Go ahead and log in on FoundryVTT.com.
Download and Install Foundry
Once you’re logged in on FoundryVTT.com click on your username in the top right of the page. From there click on ‘Licenses’ in the left hand side of the page. Download the latest version of Foundry for your system and copy your license key. Don’t worry if it says ‘Pending’. That just means that you haven’t activated a copy of Foundry with that license key yet. You can download and run the installer now and enter your license key when prompted. One thing to note is that if you’re on Windows you might get a pop up saying ‘Windows protected your PC’ without any option to continue. Tap the ‘More Info’ link in the window and click ‘Run anyway’.
Configuring the Basics
After opening the program you’ll be greeted with Foundry’s main window which consists of the Game Worlds, Game Systems, Add-on Modules, Configuration, and Update Software tabs. Before we can really get going with creating our world, there’s two things we should do. Let’s go to the Configuration screen and enter an Administrator Password. This makes it so you have to enter a password before Foundry will let you start a game and can help prevent someone from launching a world when you don’t want them to.
Lastly, we’ll want to take a look at the User Data Path field. That just tells us where all of Foundry’s data will be stored like our worlds, users, maps, etc. On Windows you can also right click on your Foundry icon in the start bar and select ‘Browse User Data’ to open right up to it. On a Mac you can open Finder, click on ‘Go’ in the top menu, then “Go to Folder” and you can paste in the User Data Path and then press the “Go” button to access it.
To save the password we just set we’ll need to click ‘Save Changes’ and accept that Foundry will close. Then we can re-open it, enter our Administrator Password for the first time and can keep going.

Installing a Game System
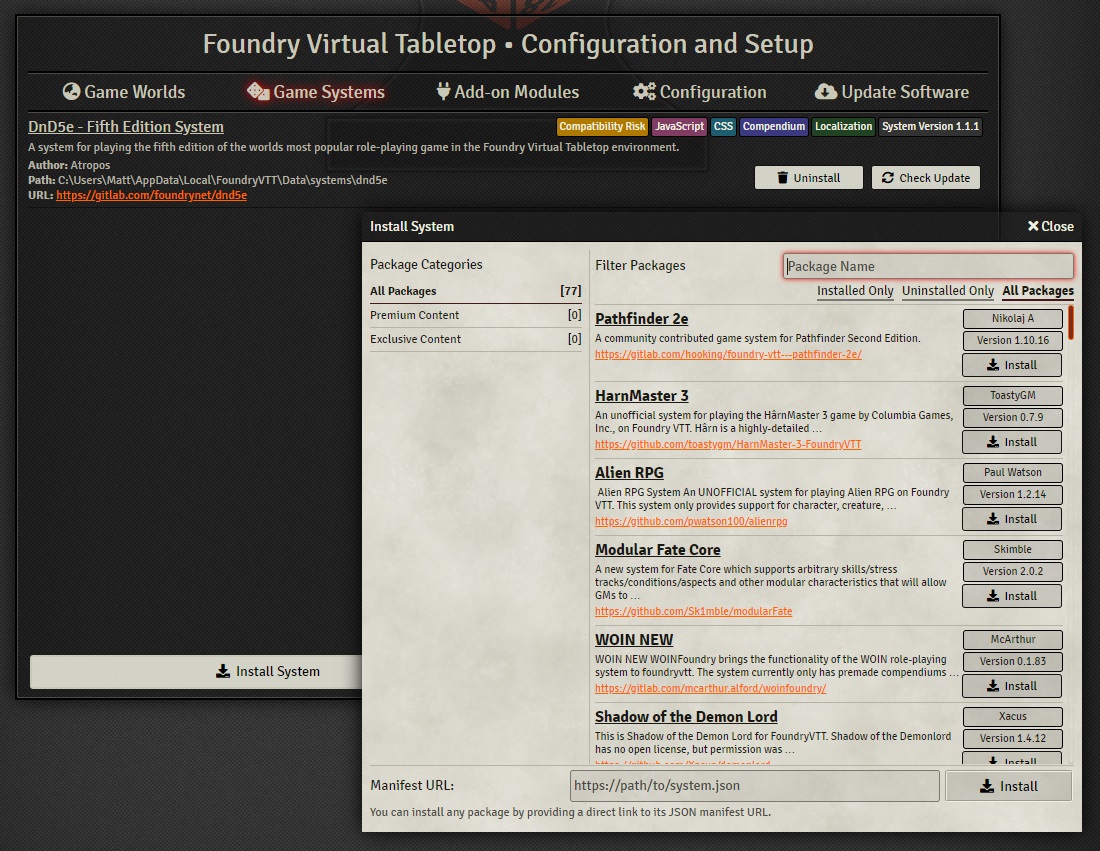
Next up on our todo list is to install a game system that Foundry can use to understand our world. We’ll be using Dungeons & Dragons 5th Edition (because that’s what I play) but there are systems for a bunch of other games like Pathfinder, Shadowrun, Fate, and more. We can take a look at all of them by going to the ‘Game Systems’ tab and hitting ‘Install System’. You can scroll through the list or start typing to find your system quickly. You can also check out the list of supported systems here.
Creating Our Game World
Now it’s time to jump back to the Game Worlds tab. Down here we can see that we’ve got an ‘Install World’ and a ‘Create World’ button. The ‘Install World’ button gives us the ability to install pre-made worlds in Foundry that are configured with everything you need to run a specific adventure. Currently there are options for Clash at the Kobold Cauldron and The Secret of the Porvenir.
Let’s close this window though and finally hit ‘Create World’. We’ll get a new window where we can enter our World Title. The World Title can be whatever we want and can include spaces and all kinds of fancy characters. The Data Path field though will be used in the URL structure of the game so we want to use basic text characters here and replace spaces with dashes. Choose your Game System which in my case is Dungeons & Dragons 5th Edition and that’s all you have to set to be able to create your world. If you’re curious about the other settings though the Background Image field will let you set a background image for the page that your players will see when they’re logging into your game.
You can also set when your Next Session is as a friendly reminder to your players (though it won’t actually do anything or stop them from cancelling at the last minute). If you’re like me you’ll also enter a long winded World Description that people aren’t really interested in. Now just hit that ‘Create World’ button and we’re good to go.
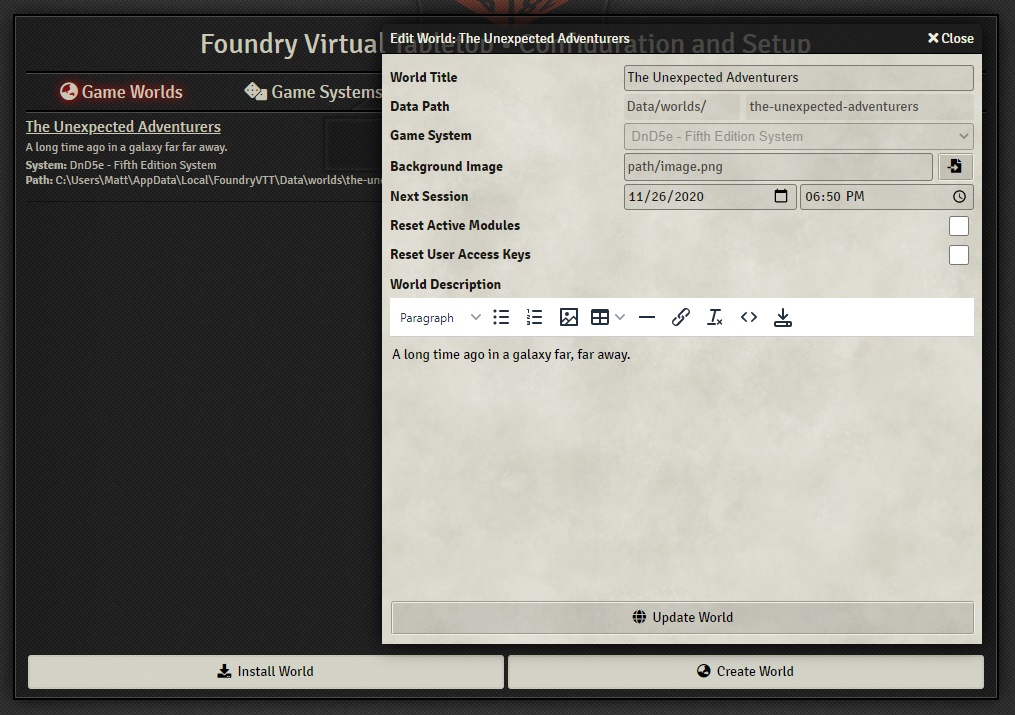
You can always go back and edit those settings (other than the Game System and the Data Path fields at least) by clicking ‘Edit World’ in the main Game Worlds tab. You’ll see that now there’s a new Reset Active Modules checkbox which will deactivate any modules that you’ve got running in your world if they’re causing you trouble. You can also reset your user access keys which will get rid of your player’s passwords in case they forget them. We’ll leave that be for now since we don’t have any users or modules and hit ‘Update World,’ and we can now launch our world by clicking the ‘Launch World’ button.
Launching Our World and Joining the Game Session
Now that we’ve configured Foundry VTT, installed our game system, and created our world, it’s almost time to actually join it! Before we do that we can see our list of players and enter an access key for the selected user. We’re the Game Master but there’s no access key set by default so we can leave it blank. Then we’ve got the Game Details section that shows when our next session is and how many current players are connected as well as our World Description over here.
Then there’s the Return to Setup button. If we enter our Administrator Password from earlier we can then click Return to Setup to quickly get back to our main screen. This password requirement will prevent our players from being able to get back to the set up screen and changing our settings.
Now let’s go to Select Player and click ‘Gamemaster’. There’s no Access Key necessary because we haven’t set one for the ‘Gamemaster’ account yet (the Administrator Password we set up earlier is different and is for protecting the Foundry application, not our specific user). Then hit ‘Join Game Session’ and we’re in!
If you want to get back to your log in screen or your set up screen you can navigate to the last tab in the right hand sidebar and click Log Out at the bottom or Return to Setup. We’ll click Return to Setup so we can take a look at the Update Software tab now.
Over here we can select the kind software updates we want to get. Let’s leave it as Stable and leave the beta testing up to other people. You can click Check for Update to see if there’s any new versions and if there is you’ll get a window telling you about what the new features are which you can accept and then install the update.
If we jump to the Game Systems tab we can also easily check for updates for it and if we had any Modules installed we could do the same for them.
That should cover just about everything that you should know when setting up Foundry. In the next guide we’re going to go over creating your first scene, adding a map, and setting up the grid so I’ll see you in the next one!