Lighting and Dynamic Line of Sight in Foundry VTT

Foundry Basics
Hello everybody! Now that we’ve got our map imported and walled up properly we’re going to take a look at lighting and how it impacts dynamic line of sight. The first thing that’s important to know is that DMs see differently than their players. A player’s visibility is always limited to what their tokens can see. DMs on the other hand can see the entire map if they don’t have a token selected. If they select a token or a group of tokens then they’ll be able to see everything that those tokens are able to see. This makes it so you can keep a good visibility of the map, or zero in and see exactly what one of your players is seeing. In this guide I’ll be jumping back and forth between a DM’s view and occasionally a player’s view which will be indicated on screen.
Vision/Lighting Basics
There’s three ways that you can control what your players can see with lighting and vision outside of the walls, doors, and windows that we covered in the last video. Before we get into those though let’s start by taking a look at what a player that doesn’t have any form of dark vision can see on a map that doesn’t have any lights placed on it and global illumination turned off. It’s basically pitch black. That’s because, just like in real life, darkness is the absence of light. Without anything to illuminate the scene it will be impossible to see.
Dark Vision
Some of you are probably saying “BuT i HaVe DaRk ViSiOn!” and you’re right. With dark vision you should be able to see more than this. So that will be the first thing we’re going to add. Let’s change what our actor can see by double clicking on the Actor in the sidebar and opening its prototype token settings which you can learn more about in Part 3 of this series but basically serves as our token’s blueprint. Then change to the vision tab and we can see that our dim vision and bright vision are both set to 0. If you didn’t read Part 3, dim vision controls how far you can see in the dark as if it were dim light and bright vision controls how far you can see in darkness as if it were bright light. Dark vision lets you see out for 60 feet as if it were dim light so we’ll set that to 60. If you had an eldritch invocation like Devil’s Sight which gives you 120 feet of bright vision you could change bright vision to 120. Now I’m going to save our changes by clicking ‘Update Token’ and delete the token I previously had on the map. I’ll drag this new token onto the map and click on it so we can see what it sees.
That’s a big improvement. We can now see a lot more of the area around us and as we move through the map we can see the fog of war dissipate. It’s important to note however that even though that part of the map has been revealed if something happens that’s outside of our vision range we won’t be able to see it. This sneaky kobold for example is hidden because it’s more than 60 feet away.

Visibility with no dark vision or lights on the scene.
Adding dark vision and checking visibility.
Global Illumination Off and On Demo.
Global Illumination
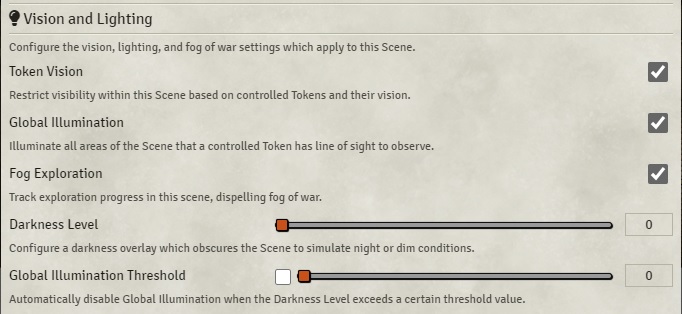
Now that we’ve got vision on our token and we know a bit about fog of war let’s go a step further. Oftentimes you’ll want the entire map to be visible and to only have your player’s vision restricted by walls and other obstructions. For that we can use Global Illumination which is a setting we can set on individual scenes. So let’s open this scene’s configuration window by double clicking it in the sidebar or right clicking a scene and selecting ‘Configure’. We already went over most of these settings in Part 2 so be sure to check that out if you’re not familiar with them. For now though let’s jump down to the Global Illumination checkbox here. We’ll check it, hit ‘save changes’, and then check out the map as our player. Suddenly we can see everything that’s not blocked by walls.
This is the simplest lighting set up that you can have for a scene. But what if your players might go to this map when it’s day or night and you won’t know till they go there? That’s where we can use two great Foundry settings: darkness and the global illumination threshold.
Global Illumination Threshold and Darkness
These two settings work together to make your lighting a lot more flexible. First let’s talk about darkness. If we open our scene configuration window again we can see that there’s a darkness level setting currently set to 0. If we increase it we can see that the map starts to get darker. We’re basically applying darkness to the map. This can be useful just to make a map darker but we can use it along with the global illumination threshold to turn global illumination on or off and to control other lights we’ll place in the scene in just a moment.
To put it simply the global illumination threshold says “if the darkness level is above this value (say, .5) then turn global illumination off”. So let’s check this box to enable the threshold and set it to .5. If we increase the map’s darkness level above .5 global illumination turns off and the map becomes dark again as there is no light.
Scene Vision and Lighting Settings
When we increase the Darkness Level over the Global Illumination Threshold we can see the edge of our vision.

The light source configuration settings.
Lights will enable or disable depending on the darkness level if you set the darkness threshold in the light.
The Light Tool
Now that it’s dark on the map again we’re back where we started. So what can we do to light a scene other than global illumination? That’s where the light tool comes in! You can access that by going to the light bulb icon in the left hand side of the screen. There’s a few tools in here but the default one is what we want. It will let us create light sources by clicking and dragging on the scene. Once it’s placed we can double click on it to access its settings. Let’s break down the settings here before we go further:
The Light Type setting controls how the light we placed behaves. Local light means that the light is blocked by walls but it will shine through things like windows and you can’t see a light if there is a wall between you and it. Global lights on the other hand won’t ignore walls but you can see the light no matter how many walls are between you and it. Universal lights will ignore walls and are visible from anywhere on the map no matter how many walls are in between you and it.
The x and y coordinates just control the positioning of the light and can be ignored because we can just click on a light with the light tool selected and move it around ourselves.
Next up the dim light and bright light radius settings controls how much light it emits of a certain type. A normal torch for example will emit 40 feet of dim light and 20 feet of bright light and as you make changes you can see them reflected in the scene. The emission angle setting controls in what directions the light shines. It defaults to 360 degrees but you can limit it and then use the light rotation angle setting to move it around to face a certain direction.
Next up is a familiar setting, the darkness threshold. This can be set on each light that we place on the map and works very similarly to the global illumination threshold. The global illumination threshold turns off global illumination when the darkness exceeds a certain level but the darkness threshold turns a light on when the scene’s darkness level goes over the value we set here. So that means if we set the global illumination threshold and the darkness threshold on our lights to the same value we can have it turn off global illumination and turn on our individual lights quickly and easily! We’ll take a look at how to do this a bit more in a couple minutes.
The next few settings are the fun ones. We’ve got light color which is obvious enough and then color intensity which makes the color more visible. Then we’ve got the light animation type. This setting contains a variety of animated effects that can be applied to any light placed on the map or emitted out of a token like we went over in Part 3. Here’s a demo of what each one looks like but keep in mind you can use any color that you want and you can also change the speed and intensity of the animation with the last two settings in our light source configuration window.
One final note about lights is that if you set either radius to a negative value it will create darkness which still works with basically every animation type and is the only way to use the last two options of Black Hole and Roiling Mass.
Now that you know all about these lights we can end by covering the last few buttons in the light tool’s toolkit.
Light Animation Demo.
Using the change to night tool then changing back to day and resetting the fog of war.
First off we have this sun and moon icon which are used to change the darkness level of the scene you’re on. The sun will reduce the darkness level to 0 and the moon will increase the darkness level to 1 so you can quickly change your lighting set up.
After that we have the cloud icon which resets the fog of war back to what it was at the start and then the trash can icon will delete all lights that have been placed on the scene.
With the last of the lighting tools covered you should know just about everything that there is to know about Foundry’s lighting system and a lot about its line of sight system. Next up we’re going to take a deep dive into the character sheet, including adding class features, items, and spells to our characters and enemies, so I’ll see you in the next one!