Player’s Guide to the User Interface in Foundry VTT

Player's Guide
Let me guess: Your DM has been raving about this thing called Foundry VTT for a couple weeks now and they’ve decided to start a game online or switch your game from Roll20, Astral, or Fantasy Grounds over to it. Now you have got to learn how to play online for the first time or at least how to do it in Foundry. I’m going to try and make that as easy as possible.
This part of the guide is going to focus on the basic user interface. Be sure to check out the rest of the Player’s Guide which focuses on your character sheet, combat, rolling dice, reading and writing journals, controlling your token, and controlling your audio and video if you’re using Foundry’s built in video chat. I’ll also cover some shortcuts and nice quality of life tips. This will all be done using core Foundry features so some things might be different if your DM has installed modules to change how Foundry works. Let’s get started!

Foundry Overview (click any image to see a larger version).
Scene & Map Navigation
This is the basic view that you’ll have whenever you join the game. First off, if you want to see different parts of the map you can use your mouse wheel to zoom in and out and press and hold right click to pan around the map. You can also hold CTRL (or CMD on a Mac) and use the arrow keys to pan around the map which should be easier for those of you on laptops. In the top left is just a Foundry logo, and to its right you’ll see a list of scenes that you have access to and scenes are just different maps that you can go between. Your DM will have the ability to drag you willingly or unwillingly to different scenes. You can click the arrow to the left of the scene list to gain a little bit of screen real estate back by hiding the navigation bar.
Control Bar
Right below that is what I’ll call the control bar. Each block on the left hand side is a category of tools and the right hand column shows the tools available in that category.
The basic controls can select tokens, mark targets, and measure distance.
Basic Controls
The first category are your basic controls. This covers selecting tokens, selecting targets, and measuring distance. You’ll probably spend most of your time on the selection tool, since this is what you need to be on to move your token around.
Hover over a template and press backspace to delete.
Measurement Controls
The second category are your ‘Measurement Controls’. This will let you click and drag to place measurement templates like circles, cones, squares, and rays for seeing how many people you can catch in a cone of cold or fireball.
Once you’ve placed a template, you can move it by clicking and dragging from the icon the template originates from. You can also delete it by hovering over it and pressing the ‘delete’ key while you still have the ‘Measurement Controls’ category selected.
Lots of effects will give you the option to place a pre-sized template for you automatically, which we’ll look at more in the Player’s Guide to Combat in Foundry VTT.
The ‘pin’ button keeps journals visible even after you switch to a different control.
Journal Notes
The third one is related to journals. Journals can be found in the right hand sidebar under ‘Journals’ or placed on the map and any that you have access to and are placed on the current map will be visible when you’ve selected this category. You can also click the ‘Pin’ toggle so they’ll be visible even when you change back to the other control categories.
Your DM may also give you the ability to create journal entries that you can use for notes. If they have, then in the ‘Journals’ tab of the right-hand sidebar, there will be a button up at the top that says ‘Create Entry’.
Player Configuration
Down below you’ve got your ‘Players’ list. The names of any players who are logged in will appear here, or you can expand to see the full list of players.
You can right click on your name here to get access to your ‘Player Configuration’ window and change your ‘Player Color’ (which also controls your webcam border color if you’re using Foundry’s built in audio/video system) and which character you’re controlling.

Drag and drop functions from your character sheet to create a macro.
Macros
To the right of that we’ve got our macro bar. You can drag commonly used functions here from our character sheet, then roll them right from the macro bar.
You can also click in an empty space and create your own macros that can be simple roll formulas or more complex javascript based commands. You may need GM-level permissions to do some things with scripts though so talk to your DM about possibly using the Furnace module’s “Run as GM” macro functionality if you want to do that.
You can have multiple pages of macros and run them using the number row on your keyboard. Click the arrows to the right to scroll through them. You can also pop open a new window of all your macros or hide the macro bar if you need all the screen that you can get. Click the arrow above the folder icon to hide the macro bar, or click on the folder to pop it out into a new window.
Sidebar
The last part of the user interface we’ll look at for now is the right hand sidebar. I’m just going to quickly go through what each tab is for and then we’ll look at them in more detail as necessary later.
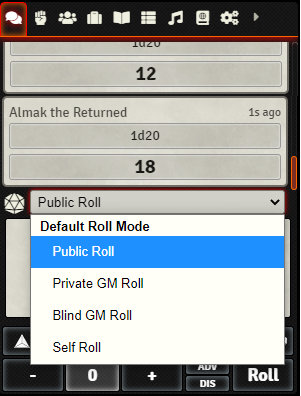
Chat Log
The first tab has our chat log where we can see all the messages that have been sent as well as dice rolls and attacks. You can change who your rolls are visible to by changing the dropdown just above the chat box to be visible to everyone, just the DM and yourself, only the DM, and only to yourself.
There’s a bunch you can do with the chat, which we’ll get into in Part 5.
Combat Tracker
The next tab is the ‘Combat Tracker’ tab. When you go into combat this is where you can see the initiative order, end your turn, and the status effects impacting you and others. One important thing to note is that other than the chat tab you can right click on any of the other tabs to make them pop out so you can move them elsewhere. I like to bring the combat tracker to the left underneath the normal controls and leave the chat window visible.
![]()
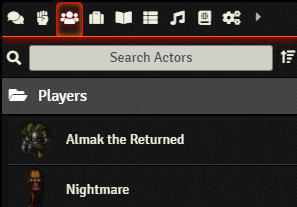
Actors Directory
After that is the ‘Actors Directory’ tab. You won’t find George Clooney’s number here but you will find all the ‘Actors’ that you have ownership of. Almak for example has a riding horse and he can double click on himself or his horse to get a look at their character sheet.
Items Directory
Then we have the ‘Items’ tab. This may be empty as a lot of DMs keep their items in compendia (which we still have 3 tabs to go through before we get to) but if it’s not you’ll see all the items that have been imported into the world. You can double click on them to see their details or drag and drop them into your character sheet and they’ll appear in the correct location. Things like spells are still considered items so you may see them in here as well.

Journal Entries
Now we’re on the ‘Journal Entries’ tab. Here you’ll find all the journal entries that your DM has given you access to. They might have also given you the ability to create journal entries for note taking purposes in which case there will be a ‘Create Entry’ button down at the bottom. Double click on any entry to open it and there will be an icon in the top right corner when you hover over the body if you can edit it. Then you can hit save to get back to normal. There’s also a resizing icon in the bottom right hand corner for making the entry bigger or smaller. You can also double click on the title bar to quickly get it out of the way while still having easy access to it.

Rollable Tables
This next tab probably won’t come up for you too much but it’s the ‘Rollable Tables’ tab. Here you can click on a rollable table you have access to and roll for a result. Someone playing a wild magic sorcerer could make good use of this for speeding up their wild magic rolls for example. Be sure to check out my video on Rollable Tables to find out all the cool stuff you can do with them.

Audio Playlists
We’ve got the ‘Audio Playlists’ tab next. Here you can control the volume of the music being played by changing the ‘Playlists’ slider, the volume of any local sound sources placed on the map like running water or tavern background noise using the ‘Ambient’ slider, and the sound of things like doors opening and closing by changing the ‘Interface’ slider. This only changes the sound on your end of course, not other players’.

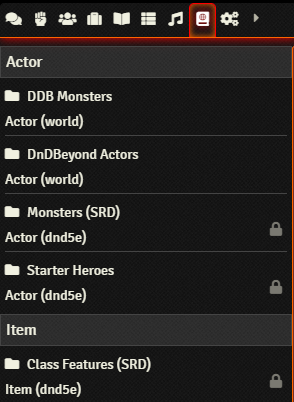
Compendium Packs
Onto the Compendium tab now. What you see here will vary based on what your DM has given you access to but the compendia you’ll probably be interested in are the Spells, Items, Classes, and Class Features compendia. You can use these to add class features, items, and spells to your character sheet by dragging and dropping them. Your DM may give you the ability to import things from compendia which you can then copy and make new versions of items or class abilities to match your game’s homebrew rules.
Settings
Last but not least is the ‘Settings’ tab where you can make changes to your settings like the maximum framerate or disabling soft shadows if you’re using an older computer, some system specific settings, and module settings for any modules that let the players make their own choices like Dice So Nice. Here you can also see the active modules, a control reference, the Foundry documentation which you don’t need because you’re here on Encounter Library learning everything that you need to know, as well as a link to the community wiki and a log out button to get back to the character selection screen. The arrow to the far right will also collapse this side bar for you.

Whew! That’s everything in the basic UI. In the next guide, we’ll take a quick look at our token’s UI, then find out how to zip around the map and even more good stuff.