Make Hand-Drawn, Weathered Map Handouts with DungeonDraft
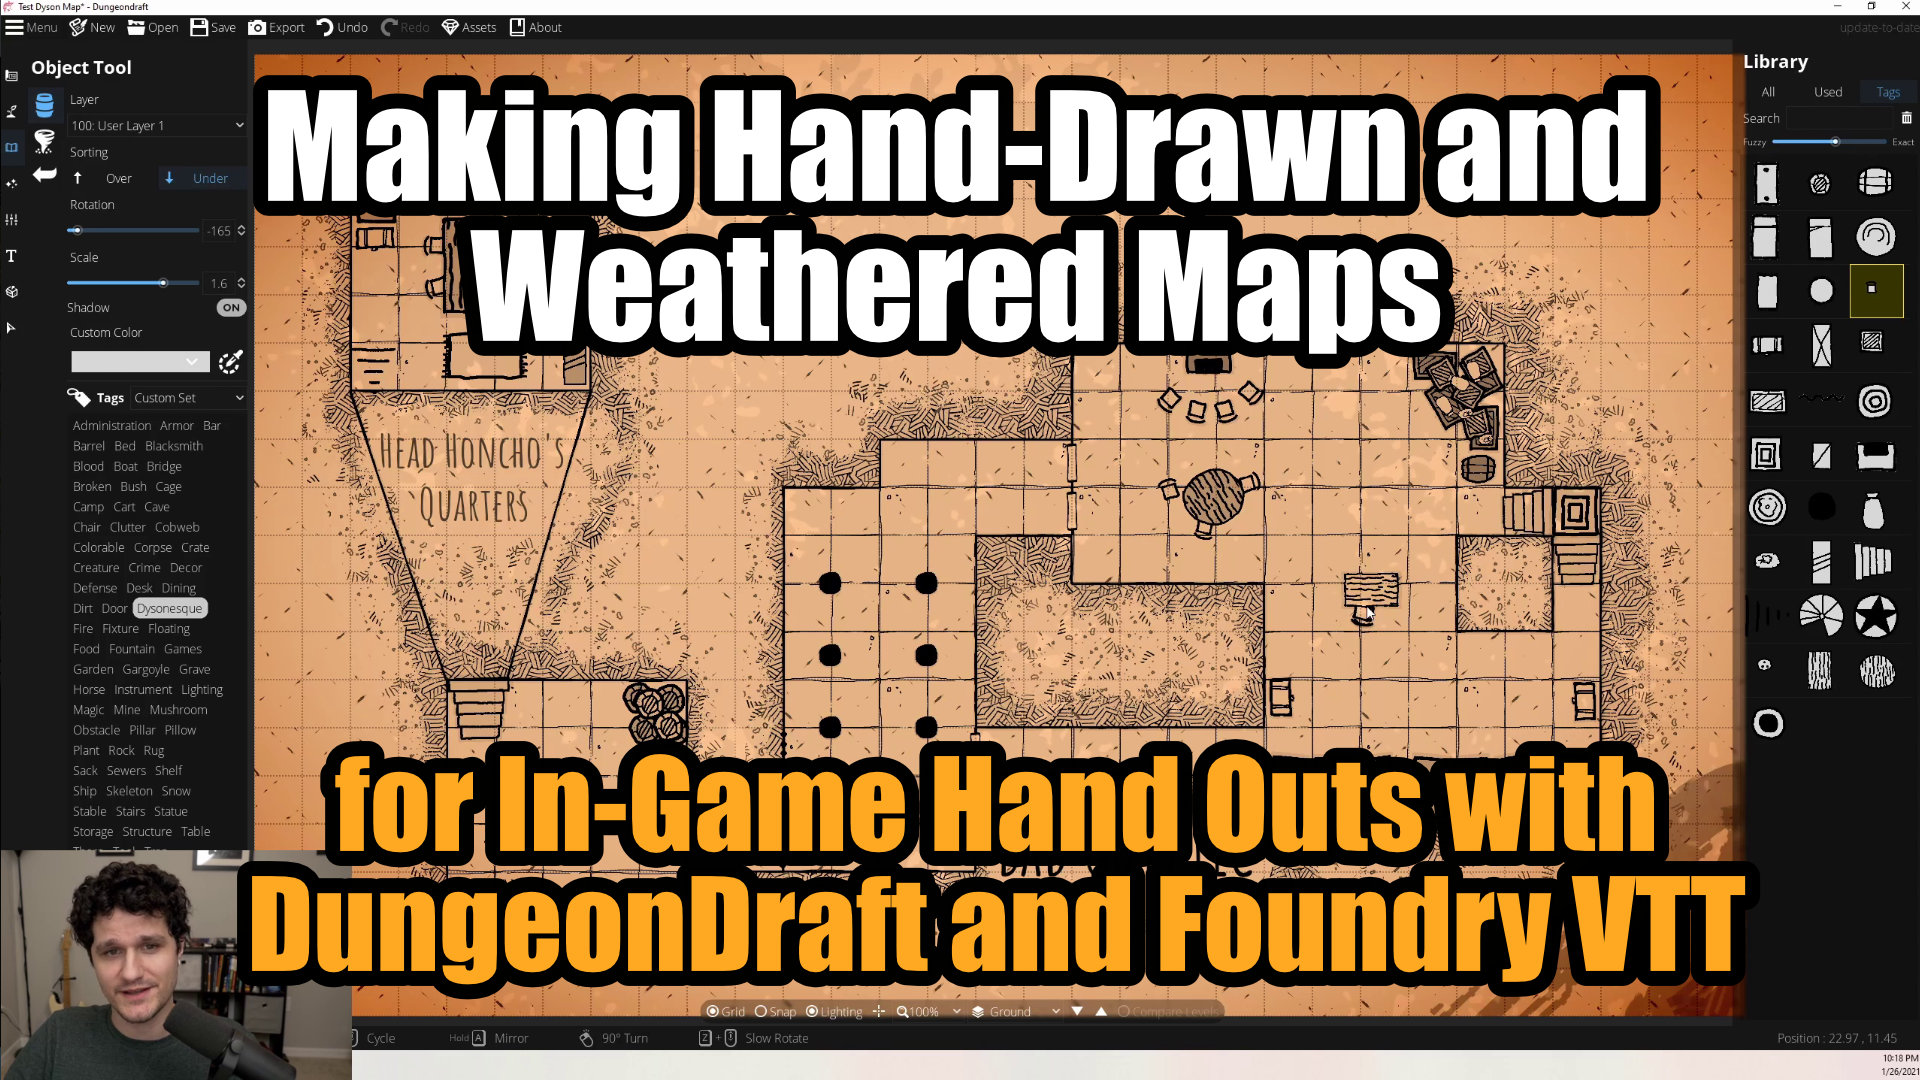
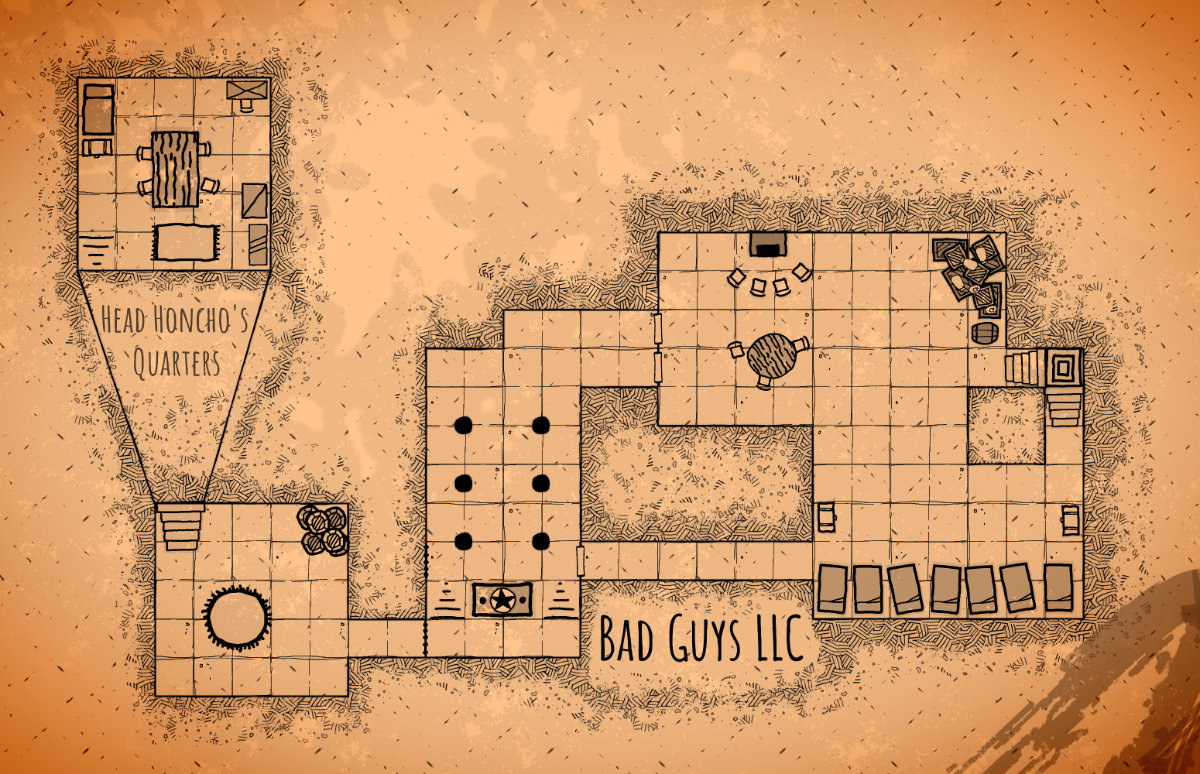
Hello everybody! Whether it’s to navigate a mega-dungeon or plan out a heist, in-game map handouts can be a lifesaver for both players and DMs and introduce a more interactive element to your game. Today we’re going to take a look at a few ways to make maps using the Dysonesque asset pack for DungeonDraft along with some tweaks to make them look worn and weathered like the one on your screen now. We’ll also go over how you can use these handouts collaboratively with your players in Foundry VTT. Let’s get started!
First off, to make a map that looks like this we’re going to need to download the Dysonesque custom asset pack by Neovatar from CartographyAssets or his GitHub.
Once you have the pack downloaded we’ll need to get it included in DungeonDraft. To do that we need to pick the folder where we want to store all of our DungeonDraft custom assets. I use a ‘DungeonDraft Custom Assets’ folder in my ‘Documents’ folder but you can put it wherever you want. Drag and drop the DungeonDraft_Pack file into your chosen folder, open up DungeonDraft and select that folder in the Asset browser and then check off the packs that you want to include. If you want more details or to see several artists who create DungeonDraft asset packs be sure to check out the video on it linked in the description.
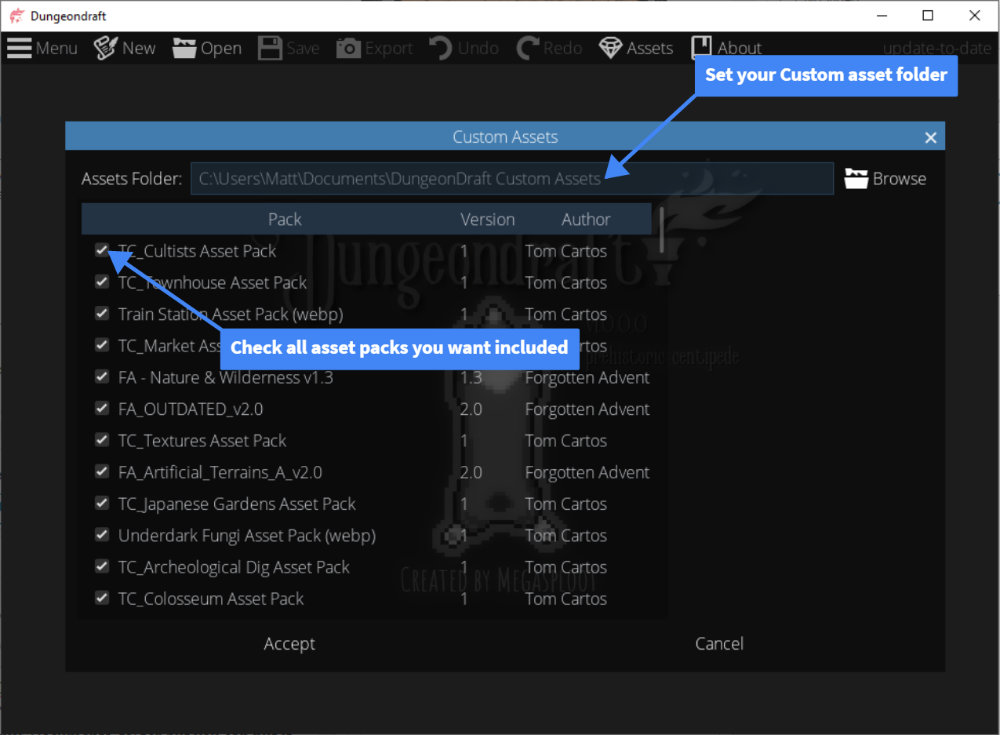
Add your asset packs by setting the folder where they’re stored and then checking the assets you want included in your maps.
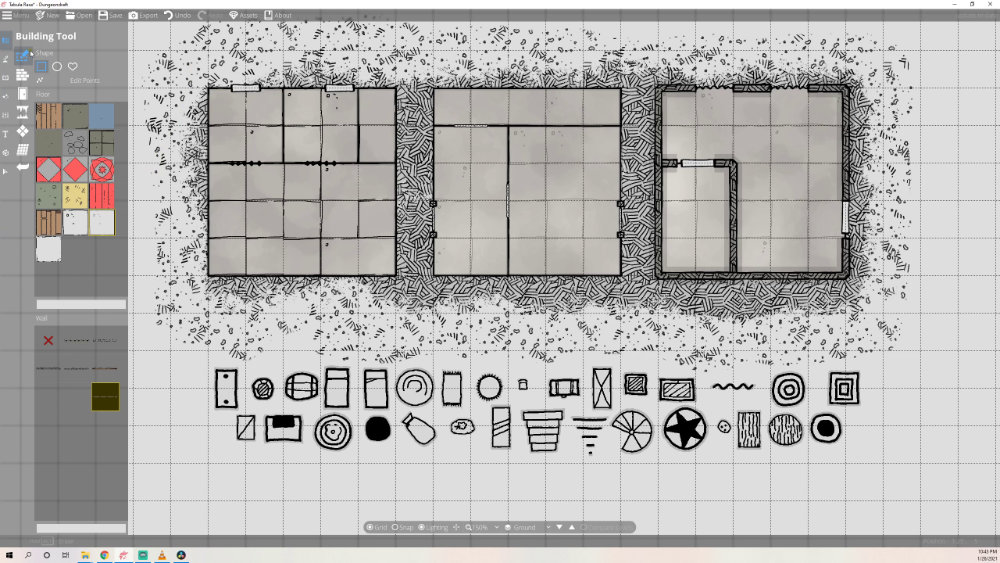
A sample of the three walls, terrains, portals, and objects available in the Dysonesque asset pack.
Making the Map
With everything ready to go, let’s take a look at what this new pack added to DungeonDraft. It gave us three new floor and pattern options, three wall options (two of which are very similar thinly drawn lines), seven portal assets like doors and windows, and 31 colorable objects in the same style. It also makes clever use of DungeonDraft’s terrain system with 3 new terrains – one that’s solid white for a background, and two different hatchmark patterns to fill in around your buildings.
Since the pack included floors and walls, that means we can use them with the Map Wizard to make randomized dungeons or castles. You could also replicate a map that you already have using the ‘Tracing’ tool or if you made it in DungeonDraft originally open it back up, create a new level, and clone your existing level into it and replace the walls, portals, patterns, and objects as needed. If you need some guidance on how to do any of that be sure to jump over to the DungeonDraft Basics series which just got a full update last week for DungeonDraft’s 1.0 release to learn more.
Demonstrating random map generation and tracing an image on a new level.
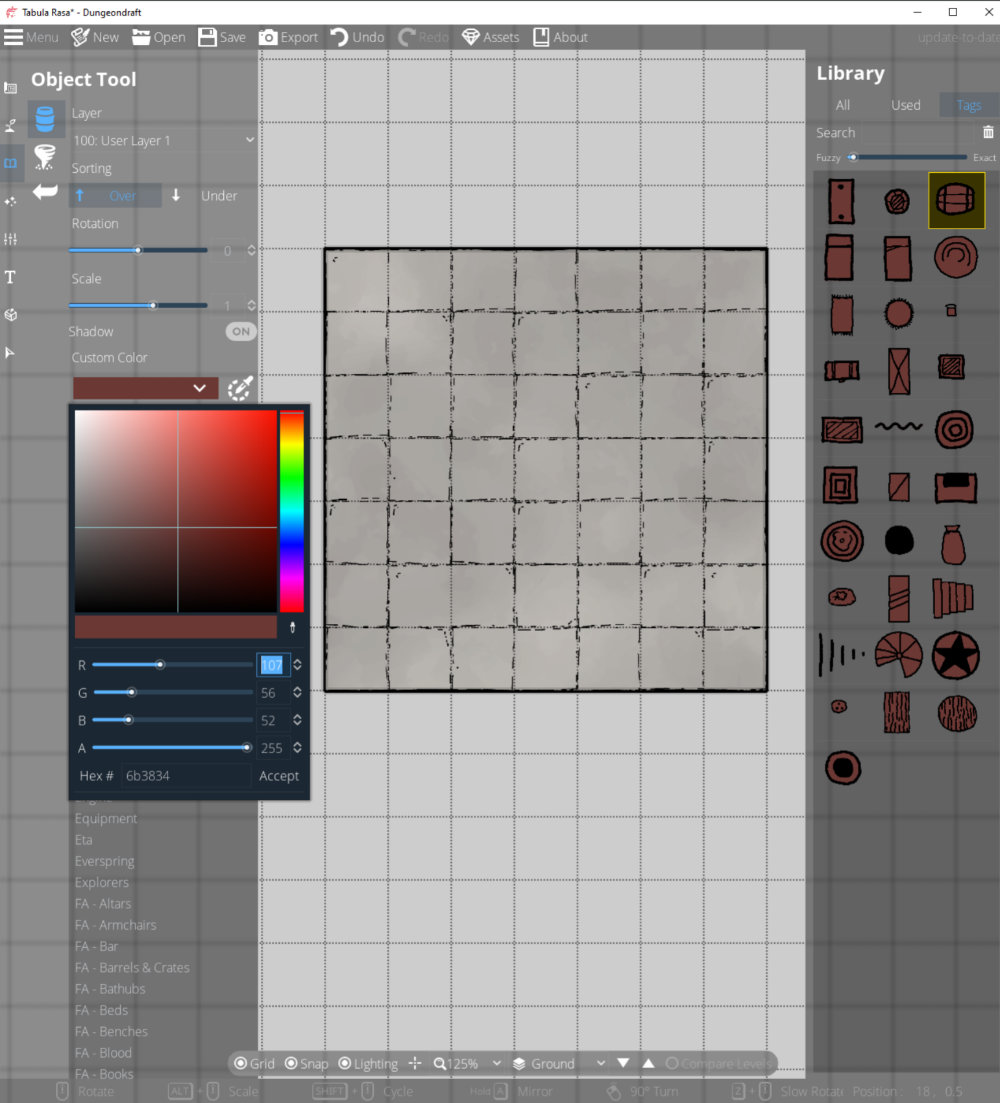
Colorable Dysonesque assets and the color picker.
However you decide to make your map once it’s all built you’ll find that there are also 31 colorable objects in this pack that you can see by filtering on the ‘Dysonesque’ tag. You’ll notice that they’re all this reddish color by default which means they’re colorable. If we change the custom color dropdown to white it will start to blend in a lot more. There’s also a bunch of stock DungeonDraft colorable assets that work decently when set to white as well if you need something not included in the pack. We’ll take a look at some more color stuff in just a moment but let’s look at adding some hatching outside of our buildings first.
Adding Hatching as a Terrain
To do that we’re going to swap over to the ‘Terrain’ tools. We’ve got three new terrains that we can find by scrolling down just a bit. There’s a solid white terrain called ‘Dyson 1’, and two styles of hatching to go around the edges of our buildings called ‘Dyson 2’ and ‘Dyson 3’.
Let’s change the default dirt terrain to the white ‘Dyson 1’ terrain to start with. Then, I like to change to the ‘Dyson 3’ terrain which looks like some broken up hatchmarks and trace around the edges of the wall on the second smallest brush size. Afterwards I change to the ‘Dyson 2’ terrain and trace the walls with the smallest brush size and then I’ll normally do a bit of clean up with ‘Dyson 1’ around the outermost edges so it doesn’t get too big. I would recommend messing around with the different brush sizes and the intensity slider to find out what kind of hatching you like best though.
With all of the basic parts of our building laid out let’s talk about color for our background, patterns, and objects.
First I place Dyson 3 hatching at the second smallest brush size and then Dyson 2 at the smallest brush size closer to the wall.
Setting a background color, floor color, and object colors at various heights can lead to a more easily discernable map.
Color/Lighting
There’s a couple of things that I like to do to try and get a bit of variety in these largely black and white maps. First off I like to drop the Environment Light from pure white down just a couple of notches. Then for the floors I bring it down a little further and over to the right. For all of the placed objects I’ve been using the bottom 4 colors in the color picker. If there’s a stack of something like crates I’ll use the darkest color on the bottom crates, the lighter gray on the next stack and so on ending with the lightest color on top. For unstacked objects around the map I just pick whichever darkness level looks appropriate like light chairs underneath a dark table. Then for things like stairs I set them to match the color that I used for the floor but a bit darker. You can also place lights around the map with any color as per usual to get some interesting effects. Don’t take any of this as gospel though, these are just things I do. Feel free to mess around and see which colors you like best and share them down in the comments.
Now for the moment you’ve all been waiting for: how to get that parchment and hand drawn look on your map.
Parchment/Hand Drawn Look
To do that we’re going to hop over to the Settings tool and go to the ‘Map Settings’ where we can turn on the ‘Sepia’ camera filter which gives us a nice aged look on the map with some vignetting around the corners. You can brighten or darken the effect by going back to your Environment Lighting and changing the brightness of the colors. If the ‘Sepia’ filter is too much for you and you’d like a bit finer control over things you can turn it off and head back to the Environment lighting tool once again and change over to an orangish color and drop the Alpha channel down to reduce its intensity until you find a value you like.
If you need to draw lines or want to show where a disconnected part of a map comes from you can use the wall tool and one of the thin lines from the Dysonesque pack to do so. Then, if you want to add some handwritten notes we can jump over to the ‘Text’ tool. There are 11 fonts that have a handwritten look to them in DungeonDraft and they are Aladin, Amatic SC (with a bold variant), Cavet (with a bold variant), Fredericka the Great, IM FELL English Italic, Just Another Hand, Marck Script, MedievalSharp, Satisfy, Tangerine (with a bold variant), and UnifrakturMaguntia Book and I’m sure all of that was totally perfectly pronounced.
With the text tool I’ve found that using a color that wasn’t pure black helped with the ‘written’ effect especially if it had hints of the paper color in it which you can get using the eyedropper tool and then dropping down to a much darker color. Once you’ve got a color set you can place any of these fonts on the map and you’ll have a pretty convincing handwritten note!
Adding the parchment look using either the Sepia filter or some environment lighting.
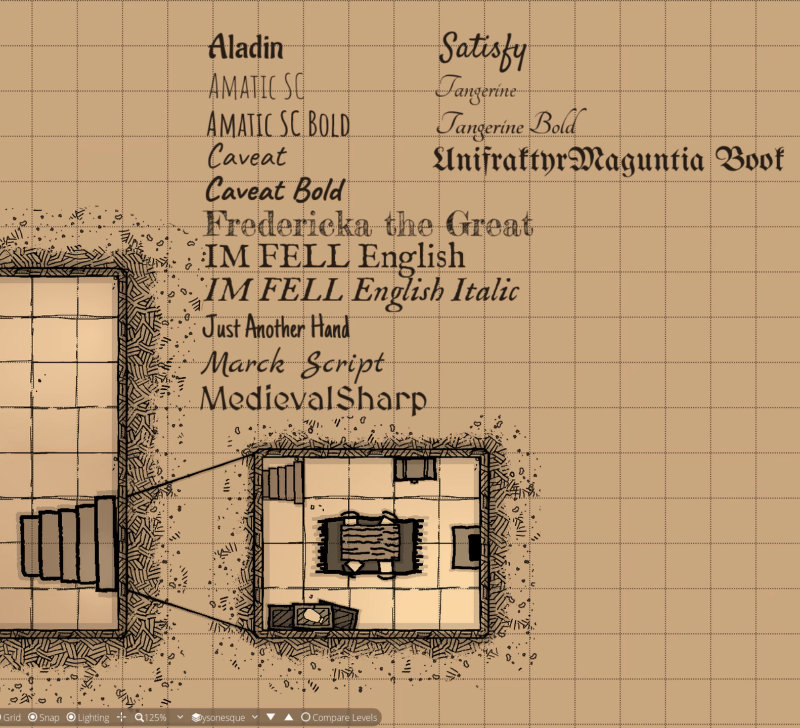 Example of lines drawn with walls and handwritten fonts.
Weathering a Map with paths, objects, and lighting effects.
Weathering
Now that it looks like we’re on parchment and we have some hand drawn elements let’s add some weathering to our map. We’ve got a bunch of options here like using DungeonDraft’s blood trail path to make it look like the map was pulled from a fallen enemy. Keep in mind if you’re using the Sepia filter the blood trail path winds up looking more like a stain than blood which can also be a good effect so no harm no foul.
You can also place local light sources around the edge of the map to lighten portions of it if you increase their range and decrease their intensity to match your taste. Rounding out what you can do with the built-in tools you can also take the blood puddle objects which are colorable and add more blood to the page or change it to another color and have it serve as ink splotches across the map.
If you have the Forgotten Adventures packs as well you can use their colorable blood puddles on the map for realistic blood or splotches of ink in the same way. They’ve also got great damaged wood patterns that are mostly transparent that you can place on the map to make it look more beaten up. Then you can add on some of their custom lights like their canopy styles to make the map look even splotchier.
Exporting
But, now that we have our map made up, let’s get into how you could use it as a handout for your players in Foundry. Firstly, you’ll need to export it. Up at the top, click ‘Export.’ The Dysonesque floors are already gridded so I turn off the grid but that’s up to you. If you tinted your map with environmental lighting be sure to leave ‘lighting’ turned on and you can also apply the sepia filter now if you didn’t before. If you want the map to include walls you can use the universal VTT format, otherwise a JPG or PNG will work fine. Hit ‘Export’ and we’re good to go.
Handouts as Foundry Journals
Now, it’s time to jump over to Foundry so we can get this set up to share with our players. There’s two different ways you could go about this depending on how you want your players to use the map. If you just want to show it to them so they can have it as a quick reference, possibly with some additional text then adding it as journal entry will be your best bet. Let’s head over to the ‘Journal’ tab, hit ‘Create Entry’ and then click on the ‘Image’ link in the header and then the ‘Upload File’ button at the bottom so we can upload our map. Once it’s uploaded, hit ‘Select File’ and then the ‘Check’ button to save it. You can of course use the ‘Text’ side of the journal as well for additional notes you may want your players to have. Then, whenever you’re ready to reveal it to your players just hit the ‘Show Players’ link while on either the ‘Text’ or ‘Image’ display to send that view to your players.
If you want your players to have access to the journal whenever they want we’ll need to change its permission settings. So, let’s right-click on the journal entry and hit ‘Configure Permissions.’ You can then set permissions either for everybody or on a player-by-player basis if it’s a map only some of them have access to. If you want them to just be able to see it, set the permission to ‘Observer,’ but if you want them to be able to edit it or write notes in it too, go ahead and set this to ‘Owner.’ Both of those settings will add it to your players’ journal tab so they can access the handout anytime.
You can also pin the journal entry to a scene – maybe where they find the handout, or where they’ll be going over it, just for easier access. To do this, just drag it onto the map where you want it, set the name, size, and icon, and you’re all set. Your players will be able to see it on the scene and open it when they select the Journal tool from the control bar. If they click on the ‘Pin’ icon they’ll be able to see it on the scene all the time regardless of which tool they’re on. All these options for journals can be used for more than just map handouts, too. You could use them to share letters or documents that your players have found, wanted posters or notice boards they find in cities, and tons more stuff.
Sharing maps as journal entries and configuring the permissions so players can see them whenever they’d like.
Sharing maps as pins.
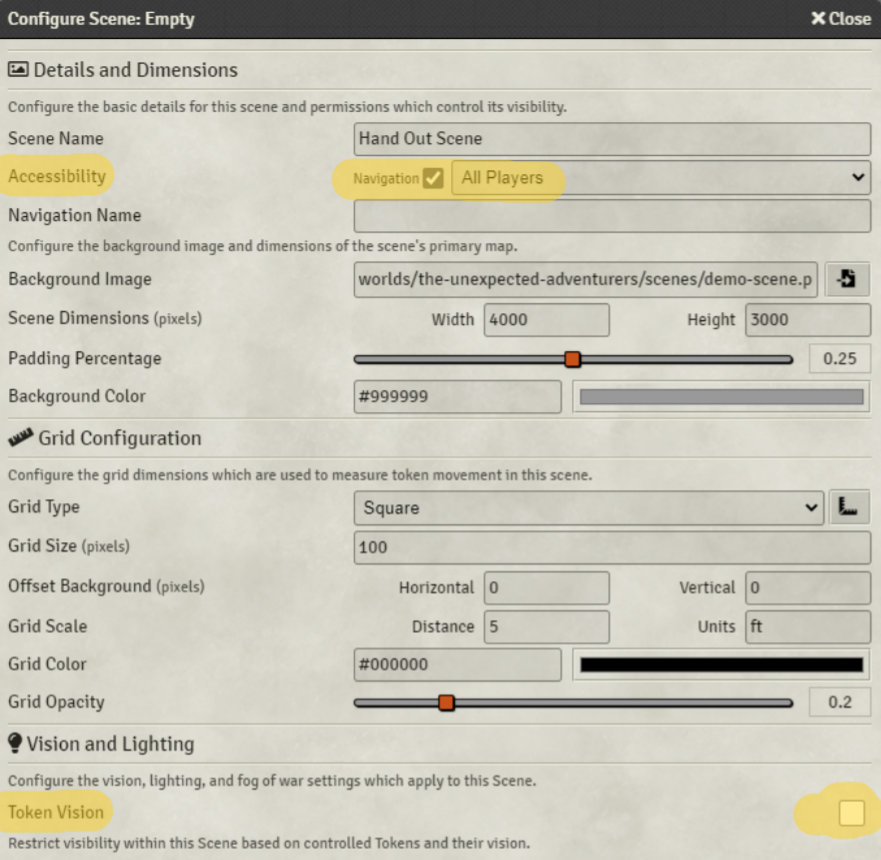 The scene configuration settings you’ll need for a handout.
 The steps to give your players access to drawing tools.
Handouts as Foundry Scenes
Another option altogether for sharing map handouts with players is making that map into a scene, and the main benefit of this is that it lets your players collaborate on the map in real time. So, we’ll set this map up as a regular old scene – of course, if you need a refresher on this, check out the Foundry Basics video or article on setting up your scenes. There’s a few settings we’ll change here that are probably different from your typical maps. Firstly, let’s change the navigation accessibility from ‘GM Only’ to ‘All Players’. This means that when this scene is in the navigation bar at the top of the screen your players will be able to change to it whenever they want. If it’s not in the navigation bar they won’t be able to access it. If we check the ‘Navigation’ box right next to that dropdown it will add the map to the navigation bar when we save our changes. Then we can add our map as the scene background. If you don’t plan on having tokens moving around on the map you can also disable ‘Token Vision’ and feel free to drop the grid opacity if you don’t want it overlaying the image. Set the ‘Grid Size’ to whatever you exported the map at in DungeonDraft, in my case 100, and hit ‘Save Changes’. If you’d ever like to add the map to the navigation bar you can go to the ‘Scenes’ tab and right click on a scene and hit ‘Toggle Navigation’ to display it or hide it depending on whether it’s there or not.
The Drawing Tools
Now, that your players have access to the map let’s make it so they can start planning on it. One of the biggest benefits to setting map handouts up as scenes is that players can collaboratively plan and take notes on the map using Foundry’s drawing and text tools. By default, these are only enabled for the GM, but you can give your players access to them too. Just head over to your settings and click ‘Configure Settings’ and then click the ‘Open Permissions Configuration’ button. We’ll scroll down to the ‘Use Drawing Tools’ setting and enable it for our Player role.
We should be able to see the ‘Drawing’ tools added to our control bar above the ‘Journal’ tools as a player now. If we change to those we can see a select tool for grabbing anything we make with the other tools. There’s also a square and circle tool for quickly drawing out shapes. Then there’s a polygonal tool which works similarly to DungeonDraft’s in that we can click around to different points but there’s no curving here. We do still need to double click to end the drawing though. Then we have a free hand drawing tool that will let you draw anything on the map and a text tool which will let you drag out text boxes on the scene and start writing. To finish writing just hit enter or click outside of the box. There’s no way to do multi-line text with the built-in text tool though unfortunately. Then we have a gear icon which lets you set defaults for all of the tools we just looked at.
Drawing Tool Configuration Settings
The ‘Lines’ tab controls the lines for the square, circle, polygonal, and free hand drawing tools and each setting is pretty obvious except for the smoothing factor which just determines how much the software should smooth out any judders or sharp turns in your drawings.
Then we have the ‘Fill’ tab which will let you fill a drawing with nothing, a solid color, or a pattern. When you set it to pattern you can set an image in the ‘Fill Texture’ field. Unfortunately for players they’ll have to know the path to the image or get it from the DM to apply an infill since they can’t navigate the file structure unless you also give them the ‘Browse Files’ permission which I wouldn’t really recommend since they could then see everything that you have uploaded. You can also of course set the ‘Fill Color’ and the ‘Fill Opacity for that color in your drawing.
Lastly, we’ve got the ‘Text’ tool which will let you input some text in the ‘Text Label’ to appear on the map, change the font family, font size, color, and opacity of the text if you want to.
We can hit ‘Configure Default’ to confirm our changes or ‘Reset Defaults’ to swap back to the defaults. To change an individual drawing your players can select them and then double right click on them to access the configuration window.
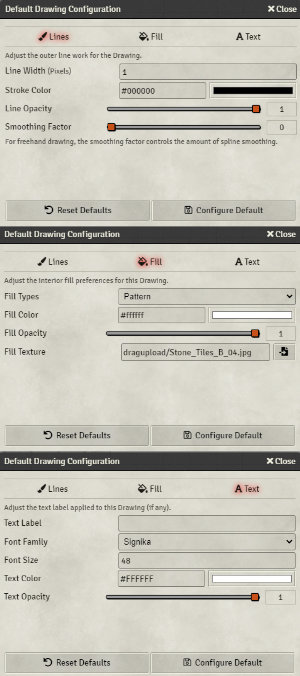
The drawing tool configuration options.
Just a note: while this does mean that your players can be super mature and just scribble over the bad guys if they start losing a fight, it also means that they can have an intuitive, collaborative way to use these handouts. If they’re planning a heist, they can clearly discuss and mark routes together on the map. If they’re exploring a dungeon, they can mark rooms off, circle areas they need to come back to later, or type a quick note of what they found right on the map.
So, rather than running your players blind through a labrynthine hellscape where they spend 95% of the game asking, “Wait, what was to the left again?,” be sure to check out this awesome Dysonesque asset pack for DungeonDraft. If you’re a DungeonDraft newbie or just need a refresher on some of the tools and settings we covered here, take a look at the freshly updated DungeonDraft Basics series, which will be linked in the video description. I hope that these assets make fantastic in-game handouts for you and make running your game a bit easier too. I’ll see you in the next one!