Using Animated Maps, Tiles, Tokens, and Spells in Foundry VTT
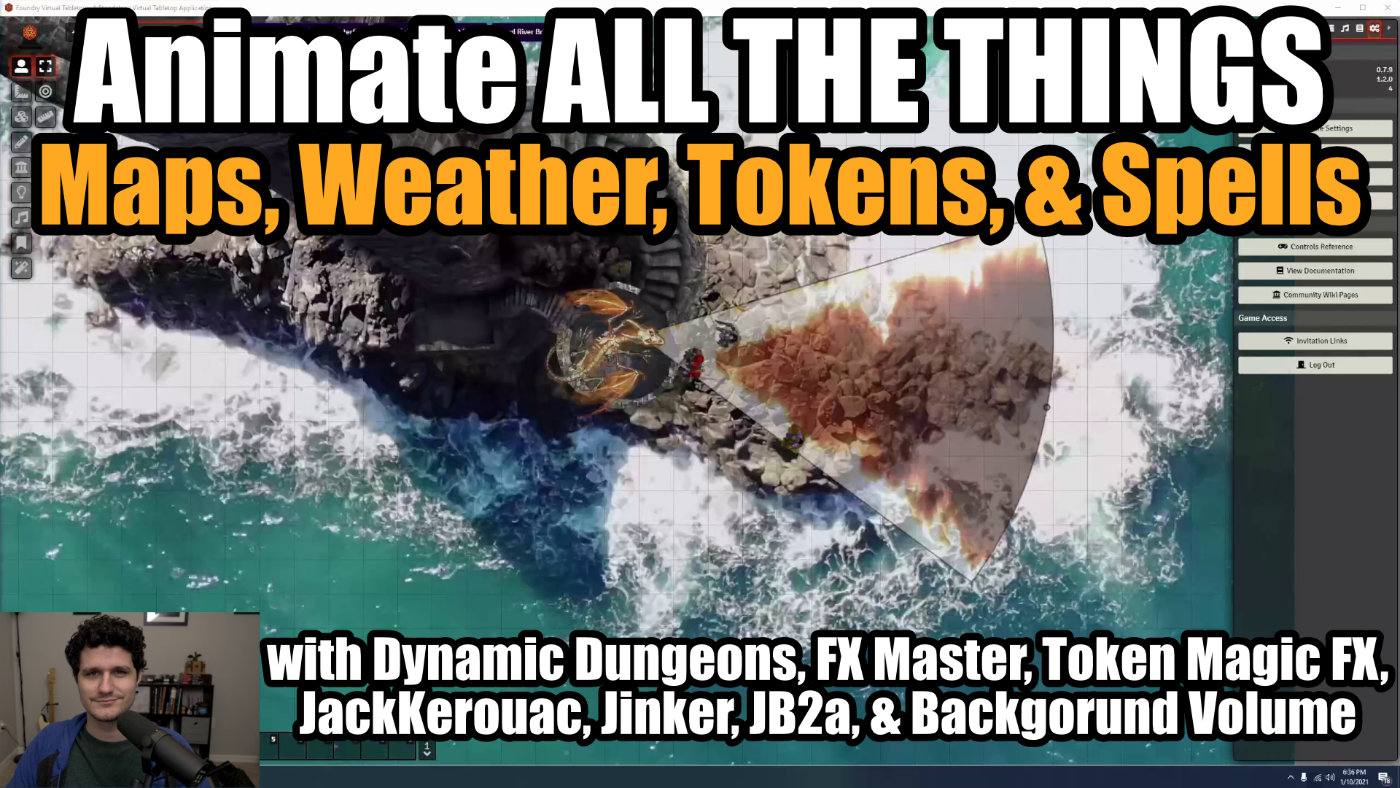
Hello everybody! The key word to today’s guide is ‘animation’. We’re going to take a look at a whole bunch of different things you can do in Foundry to make your maps more immersive. We’re going to start off by taking a look at using animated battle maps from Dynamic Dungeons who are in the process of converting their 400+ map catalog over to WebM and at a smaller file size so more people can use them. Then we’re going to add in filters, weather, and other special effects using the FXMaster module from U~Man. After that we’re going to take a look at animated tiles and tokens to make your maps even more dynamic and lastly we’re going to take a look at using animated spell templates from artists like JackKerouac, Jinker, and JB2A alongside the Token Magic FX module so it will really feel like you’re casting spells.
A demo of some of the different types of animated assets.
Animated Battle Maps
First off on our list are animated battle maps. Check out the Dynamic Dungeons Patreon page to download their maps. I’ll be using the WebM versions in this guide, but if you want the highest quality version and you and your players have the internet connections to handle 100+ megabyte maps then you can feel free to grab the originals. All of the WebM versions should be around 25 megabytes which should be easier on everyone’s connection. With the file downloaded it’s as simple as adding it in the Scene Configuration window like a normal image. Just keep in mind that since it’s a larger file you may need to wait a moment for it to upload and appear in the ‘Selected File’ field for you.
Pro Tip: Crawl Before You Walk
If you’re just getting started with Foundry be sure to check out my Basics series! Importing a map would be a good starting place.
The WebM versions are gridless and the majority of them all have the same pixels per inch of 70 so that’s what we’ll use for the Grid Size. If you’re using a particularly old map from when the exports were at 1080p you’ll want to use 50 pixels per inch though. If you’re using the original quality versions the PPI will be roughly 98.
Other than that, there’s only one thing to keep in mind which is that video maps often have audio included but there’s no built-in way to handle the audio from a video in Foundry. That’s where the Background Volume module from MTVJR comes into play. Once you have it installed and activated you’ll find a new Background Volume field in the Scene Configuration window under ‘Ambience and Atmosphere’ that lets you control the volume.
Walling works just like it does on a normal image and you can see in the accompanying WebM that I’ve got one way walls set up so we can see down on other tokens but they can’t see over the walls to us. With the map uploaded, walled, and its volume under our control that’s all that you really need to know about using animated maps!
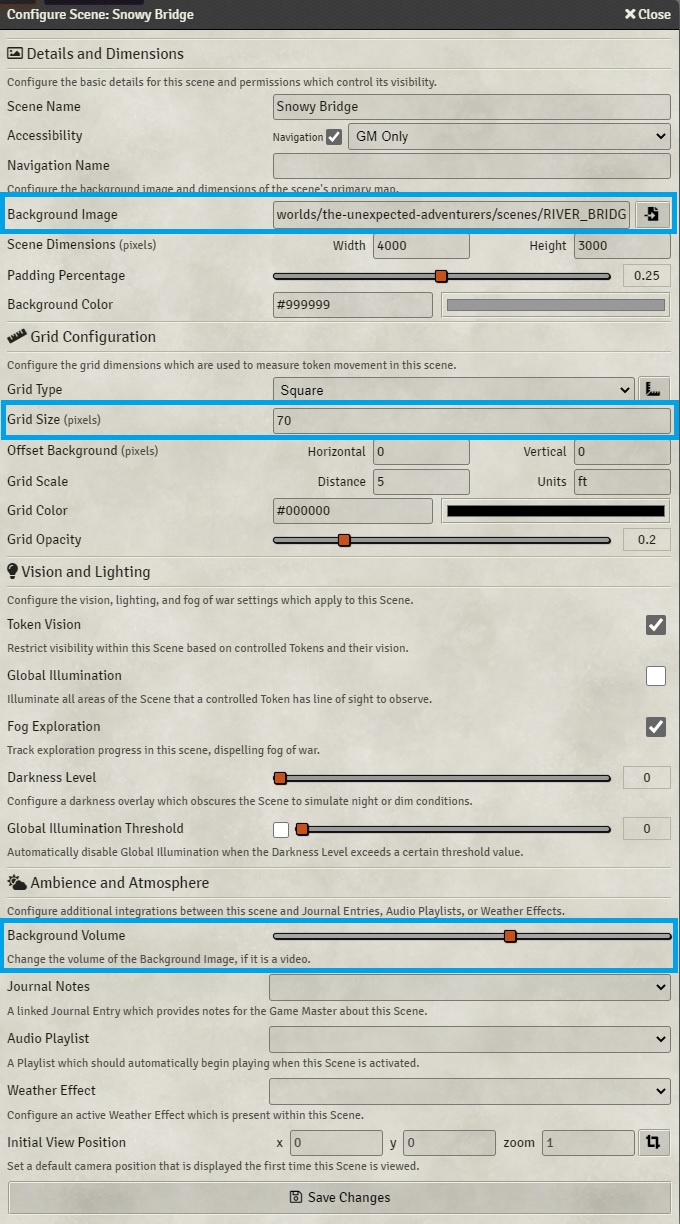
The Scene Configuration window with a WebM set and the Background Volume Changed. Click on any image to expand it.
A demo of walling and vision working as expected.
Weather and Special Effects with FXMaster
Now let’s say you’ve got the perfect map but you wanted it to be raining, snowing, cloudy, covered in embers, or even just have birds or bats flying around? That’s where FXMaster comes in. Once you’ve installed and activated the module you can use it on animated or image based maps from this new tool in the left-hand sidebar. Let’s take a look at the weather effects first which is the raining cloud icon.
Weather
Once we click on it we’ll get a new window that shows all of the different options that we have. We can check multiple weather effects and have them active at the same time and if we click the down arrow next to any of their names we’ll see options for ‘Density’, ‘Speed’, ‘Direction’, ‘Scale’, and ‘Tint’. If we check the ‘Rain’ effect and ‘Save Changes’ we’ll see what it looks like by default. If we want to make the rain bigger, we can change the scale, if we want more rain we can change the density, if we want to change the direction then we can change the direction, and if we want it to have a specific color we can check this box and set a tint.
Once you’ve changed all the weather settings that you want you can even save the current configuration as a macro by hitting the floppy disc icon underneath the ‘Weather’ icon so you can activate it quickly on any map that you want. Then it will save it to your ‘Macro Directory’ which you can access by clicking the ‘Folder’ icon next to the Macro bar. You can then click the Macro and hit ‘Execute’ or drag and drop it into your macro bar where a simple click will run it.
A demo of the weather and ‘Save As Macro’ functionality in FXMaster.
Demo of the FXMasater Special Effects Placement.
Demo of all filters in FXMaster.
Special Effects
Let’s take a look at Special Effects now. If we click on the wizard hat icon we can see an ‘FXMaster’ and a ‘Custom’ folder. The ‘Custom’ folder is where any effects that you add yourself from the ‘Add an Effect’ menu will appear but we’re going to focus on the built-in effects for now. Expanding the ‘FXMaster’ folder shows us a number of different magical effects. Let’s take ‘Red Fire Cone’ as an example. If I click on it and then click anywhere on the map it will place the animation there, run it, and get rid of it. With something like the Red Fire Cone though you’ll probably want it to be facing a specific direction. Luckily, all you have to do is click and drag in the direction you want the animation placed and FXMaster will take care of it for you.
The tool with the palette icon is the ‘Colorize Effects’ tool, and will let you apply a tint across the map.
Beneath that we have a handful of filters that will apply to the entire map. The first one is an ‘Underwater’ filter which gives a lightly distorted version of the map. Then there’s the ‘Predator Vision’ filter which applies a kind of scan line effect to the map which would be good for something like a security camera view. Then there’s the ‘Old Film’ filter which gives you a nice sepia look. After that is the ‘Bloom’ filter which adds a glowing effect to the map.
The last button, the trash can, will let you disable all of the effects and filters on the map with a couple clicks.
Animated Tiles
If you want to add even more movement to your animated maps, or if you want to liven up your static maps, Foundry can help you out there as well with animated tiles. All you need is an animated WebM or MP4 file somewhere in your Foundry folder so we can access it with the Tile Browser. You can even use the Tile Browser to upload the file if you’d like.
You can get a bunch of animated effects from modules like Animated Spell Effects from user JackKerouac, Jinker’s Animated Art Pack from Jinker, or Jules&Ben’s Animated Assets from JB2A.
All of these animated tiles can be used for things like the magical orb in the center of this map, to show the earth cracking, or to have a magical beam blasting outwards and blocking your player’s path. To place a tile just drag it onto the map from the Tile Browser. You can then scale it to the size you desire and you can even scale it proportionally by holding the ALT key while doing it. If you want to place the tile without it snapping to the grid hold the SHIFT key before releasing your mouse click.
Placing an animated tile, scaling it while maintaining its proportions, and placing it without snap to grid.
Example of a number of Devin Night’s animated tokens.
Animated Tokens
Speaking of your players, what if you want to give your players or your own monsters some animated flair? There’s not a lot of people out there making animated tokens but Devin Night has animated three collections of his tokens with the help of Geoffrey Palmer, some of which you can see here, and Jinker has produced two sets of animated CG tokens as well. Just like with animated maps and tiles all we have to do is upload our WebM to Foundry and set it as the token image and tada! We’ve got our animated tokens standing at the ready across our map.
Animating Spells and Tokens with Token Magic FX
Animated Spell Effects
With all these tokens standing around it’s time that we give them something to do. How about casting some spells with animated templates automatically? To do that we’re going to add one more module to the mix and that’s Token Magic FX which comes to us from SecretFire.
Let’s head on over to the module settings now. Before we get into the spell templates let’s go over these settings really fast. You can ignore almost all of them unless you’re creating custom effects but the two settings you may care about are the ‘Enable automatic template effects’ setting which you or your players can uncheck for performance reasons and the ‘Default template grid on hover’ setting which hides the spell template’s grid until you hover over it on the measurement tool. If you uncheck it the grid will be visible all the time beneath the spell template.
Now we can click ‘Template Settings’ underneath ‘Token Magic FX’. If you’re using a supported game system like DnD5E you’ll see options for each type of damage and for each template shape like circle, cone, rectangle, or ray in each damage type, which will let you set default spell templates for all spells that, for example, do fire damage and use a cone. There’s also an ‘Inner Opacity’ setting that controls how visible the template we’re using is and a tint for its color.
In each template shape you’ll see a dropdown to select from a number of effects that are included with Token Magic FX like flames, spider webs, smoke and a whole bunch more. If you’d like to use a specific animated WebM for a spell template though you can set the ‘Texture’ underneath the ‘Special Effects’ dropdown and disable the special effects by changing to the empty choice in the dropdown.
If you’d like to use a different template for a specific spell then just jump over to the ‘Overrides’ tab, click ‘Add Override’, enter the name of the spell, set everything as you’d like, and then hit ‘Save’ and then ‘Save Changes’. When you go to cast the spell you’ll see that your override has taken effect.
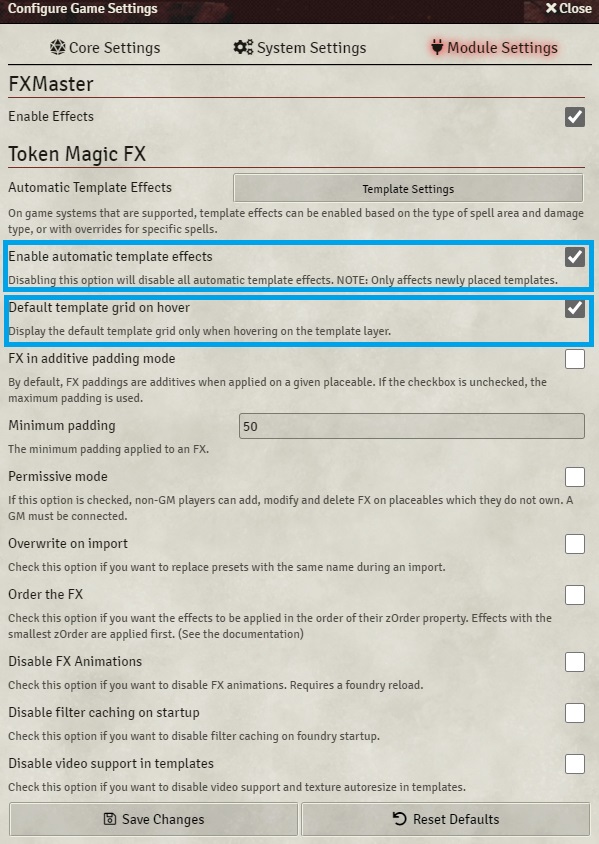
The settings for Token Magic FX.
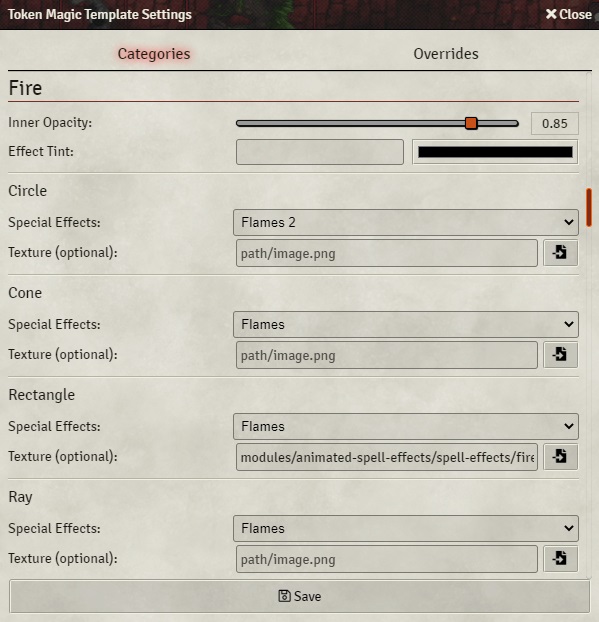
Token Magic FX Spell Template Settings.
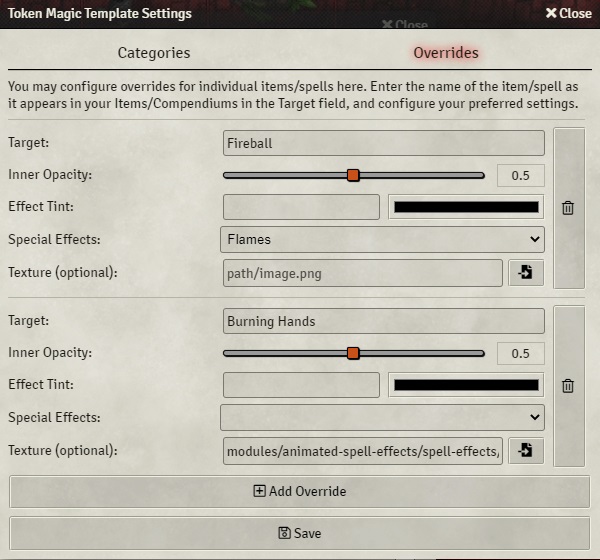
Token Magic FX Spell Template Override Settings.
Importing and using macros on a token and removing them with another.
Token Animation Macros
Before we go here’s one last bit of info on Token Magic FX. I’m not going to go into how to create your own macros for it but there are a number of macros that come with the module by default. If we go to the compendium tab and right click on ‘TokenMagic Portfolio’ and hit ‘Import All Content’ they’ll all be placed in our Macro Directory which we can access by clicking on the folder next to our macro bar. You can also open the compendium and import individual macros if you want.
These macros can be applied to tokens or tiles. Let’s select this ghost near the windmill for example. If I apply the ‘Glow’ and ‘Distort’ macro I can get an even more convincing ghost effect as it shines and shimmers in place on top of its normal movement. You can select multiple tokens at once and apply a macro to all of them and use the ‘Delete filters on selected’ macro to delete filters applied to specific tokens or tiles.
That covers just about everything you need to know to get started with animated maps, tiles, tokens, effects, and spells. I hope it’s given you some inspiration on how you can add even more immersion to your game. I would definitely recommend checking out all of the artists that were featured in this article and I’ll see you in the next one!